Before you get started: Every team and organization manages their Odoo environment differently, and there are multiple ways to achieve the same result within Odoo.sh. We recommend checking with your internal team or system administrator to confirm your company's preferred deployment process. The steps outlined in this guide reflect S4 Solutions' recommended approach and may not match your organization's specific workflow.
Once you have uploaded your module files to GitHub and Odoo.sh has finished rebuilding your development branch, you are ready to push to staging, activate, test, and deploy your module to production. This guide walks you through each stage of that process.
Before you Begin
✅ Your module files have been successfully uploaded to GitHub (see Part 1)
✅ Odoo.sh has finished rebuilding your development branch
✅ You have access to your Odoo.sh dashboard
1 - Back Up Your Staging Environment (optional)
While not required, backing up your staging environment before making any changes is a good habit — particularly if your staging environment contains valuable configuration or test data you would not want to lose.
- In your Odoo.sh dashboard, locate your staging branch.
- Click on the Backups tab.
- Click Create Backup, enter a comment to identify the backup, then select Create and wait for it to complete.
- Confirm the backup appears in your backup list before proceeding.

This step is optional for staging but is highly recommended before deploying to production.
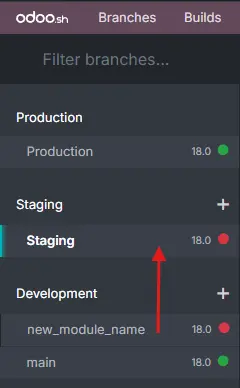
2 - Move the Module to Staging
Start by pushing your development branch to the staging environment so the module is ready to be activated and tested.
- In your Odoo.sh dashboard, locate your development branch in the Development section.
- Click and drag your development branch into the Staging branch that you would like to test in and release it.
- Odoo.sh will rebuild the staging environment with your module included.
- Wait for the rebuild to complete before proceeding.
3 - Activate the Module in Staging
With the staging environment rebuilt, activate the module so it is ready to test.
- Open your staging instance from the Odoo.sh dashboard.
- Go to Apps
- In the search bar, search for the technical name of your module.
- If the module does not appear, click Update Apps List and search again.
- Click Activate to activate the module.

Note: If you do not see an Update Apps List option, make sure Developer Mode is enabled. Go to Settings → General Settings, scroll to the bottom and click Activate the Developer Mode.
4 - Test the Module Functionality
With the module active in staging, thoroughly test its functionality before moving to production. Staging mirrors your live environment, making it the ideal place to validate everything works as expected.
Things to verify during testing:
✅ The module loads without errors
✅ All features behave as expected in your environment
✅ There are no conflicts with other installed modules
✅ Any configuration specific to your business has been applied and tested
Note: If you do not see an Update Apps List option, make sure Developer Mode is enabled. Go to Settings → General Settings, scroll to the bottom and click Activate the Developer Mode.
5 - Back Up Your Production Environment
Before making any changes to production, you must create a backup of your environment. This is a critical step that ensures you have a reliable restore point if anything unexpected occurs during deployment.
- In your Odoo.sh dashboard, locate your production branch.
- Click on the Backups tab.
- Click Create Backup, enter a comment to identify the backup, then select Create and wait for it to complete.
- Confirm the backup appears in your backup list before proceeding.
A production backup is essential before any deployment. Having a reliable restore point ensures you can recover quickly if anything goes wrong.
6 - Deploy to Production
Once your backup is confirmed, you are ready to deploy to your live production environment.
- In your Odoo.sh dashboard, locate your development branch in the Development section.
- Click and drag your development branch into the Production branch and release it.
- Odoo.sh will rebuild your production environment — this may take a few minutes.
- Wait for the rebuild to complete before proceeding to activation.
Tip: We recommend performing this step during off-peak hours to minimize disruption to your team while the environment rebuilds.
6 - Activate the Module in Production
The module will need to be activated in your production environment just as it was in staging.
- Open your production instance from the Odoo.sh dashboard.
- Go to Settings → Apps.
- In the search bar, search for the technical name of your module.
- If the module does not appear, click Update Apps List and search again.
- Click Install to activate the module.
Your module is now live and active in your production environment.
🔄 If Something Goes Wrong — How to Revert
If you experience critical issues after deploying to production, you can restore your environment to the backup created in Step 5.
- In your Odoo.sh dashboard, locate your production branch.
- Click on the Backups tab.
- Locate the backup you created before deployment.
- Click Restore Options and confirm the action.
- Odoo.sh will restore your environment to the pre-deployment state — this may take a few minutes.
- Once complete, verify your production environment is back to normal.
Important: Restoring a backup will undo all changes made after the backup was created, including the module installation and any data entered since deployment. If you are unsure whether to restore, contact our support team before taking action.